
How do you develop killer lats? First, it’s good to do lat pulldowns. Then it’s good to do pull-ups. After you’re done with that, try some rows, after which finish off with some pullovers. Or… you would just perform the reverse-grip bent-over row and get nearly the identical results as combining a series of back-focused exercises.
Credit: lunamarina / Shutterstock
Efficient programming and exercise selection can drastically improve the standard of your back workouts. Follow these steps to learn learn how to perform the reverse-grip bent-over row, and the way it is best to incorporate it into your routine to make essentially the most out of your back day.
Tips on how to Do the Reverse-Grip Bent-Over Row Step By Step
Approaching the reverse-grip bent-over row for the primary time doesn’t must be an intimidating experience. Follow these steps for a picture-perfect lift.
Step 1 — Setting Up
 Credit: Rocher Möllenkamp / YouTube
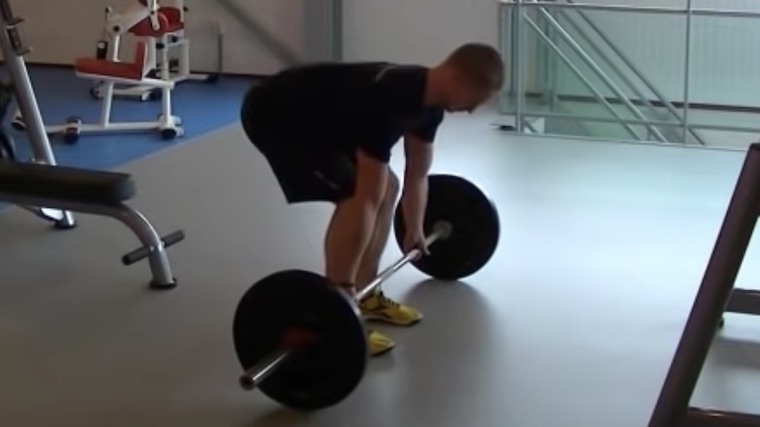
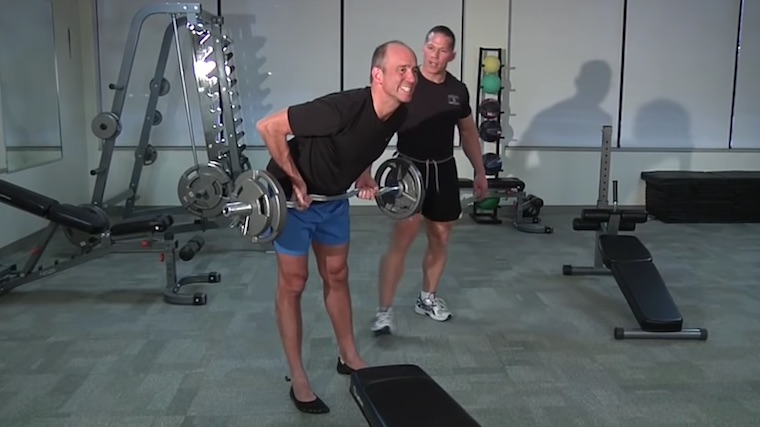
Whenever you initially approach the bar, establishing for the reverse-grip bent-over row feels a bit like establishing for a deadlift. With the barbell over your midfoot, grab the bar barely outside shoulder-width, using a double-underhand (supinated) grip — that is the “reverse grip” in comparison with the double-overhand (pronated) grip of the usual barbell row.
Brace your core, keep your spine neutral (not rounded or excessively arched), and drive through your feet to lift the burden off the ground.
Form Tip: Experiment along with your grip width to see what ends in feeling the best degree of lat (back) activation. Most definitely, establishing along with your grip just past shoulder width apart will yield the most effective results. But depending in your limb and torso length, you might feel more comfortable barely closer or wider.
Step 2 — Find Your Trunk Angle and Brace Your Core
 Credit: Rocher Möllenkamp / YouTube
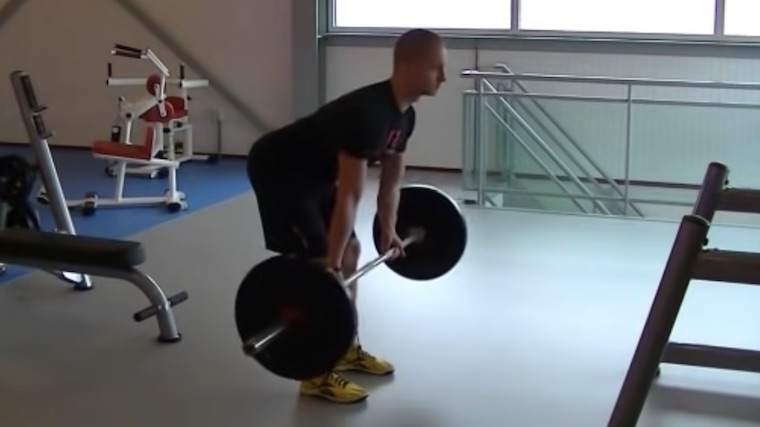
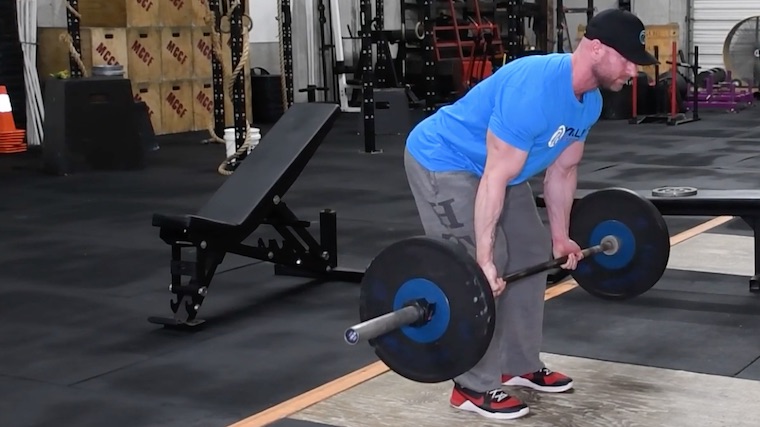
Hinge forward at your hips and stop when your trunk is pitched at roughly a 45-degree angle. Bend your knees barely and maintain that angle throughout the movement. Keep your arms straight and permit the barbell to shift barely forward. Take a deep breath and brace your core as you prepare to perform the row.
Form Tip: Consistency is vital. Keep your arms at a dead-hang when you arrange. This may reinforce the position you need to hold firstly and end of every rep.
Step 3 — Pull From Your Elbows
 Credit: Rocher Möllenkamp / YouTube
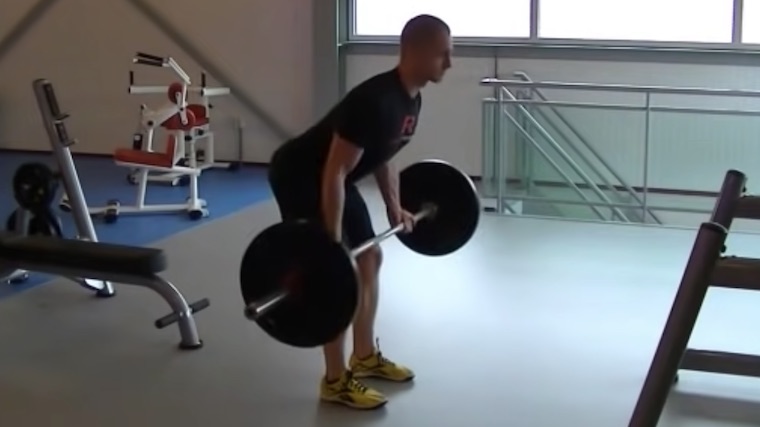
Squeeze and depress your scapula (pull your shoulder blades together and “down” toward your tailbone), then pull your elbows back. As you lift the burden, consciously engage your back muscles before you contract your biceps.
Proceed pulling the burden toward your trunk until the barbell makes contact along with your torso. To specifically goal your lats fairly than your upper back muscles, make the bar contact closer to your belly button than your sternum.
Form Tip: Don’t be concerned in case your bar path isn’t a superbly straight line. Pulling towards your belly button may feel awkward at first, but it is best to quickly notice increased lat activation when lifting this fashion.
Step 4 — Lower the Weight
 Credit: Rocher Möllenkamp / YouTube
Squeeze your back muscles at the highest of the lift and consider holding the burden there for a moment. Keeping your back flat and your core tight, lower the burden back to the stretched position until your arms are fully prolonged.
Maintain the forward hinge position throughout all the set. To perform the following repetition, pull the barbell toward your belly button again.
Form Tip: Keep the movement relatively slow and controlled. This helps to avoid using momentum from one repetition to a different to lift the burden.
Reverse-Grip Bent-Over Row Mistakes to Avoid
If you’ve a passing familiarity with the standard bent-over row, or hinge movements as an entire, you would probably jump right into using the reverse-grip bent-over row to construct your back and biceps without considering too hard about form. Nevertheless, slipshod technique could mean you’re leaving gains on the table, and even putting yourself at an increased risk of injury.
Setting Up With a High Torso Angle
Either tight hips and hamstrings, a weak core, or a mixture of the 2 could make it difficult so that you can hold your trunk at a 45-degree angle across a whole set of rows. Consequently, you would find yourself performing more of an upright row than you plan.
 Credit: SOK Studio / Shutterstock
Organising with a better torso angle can lead to increased muscular activation in your trapezius and your rhomboids, which suggests less isolation in your lats.
Avoid it: Whenever you setup to perform the row, make sure you hinge forward and shoot your hips back to create a robust pulling position. Add hinge movements just like the deadlift, Romanian deadlift, and the great morning into your training plan to develop greater levels of strength, balance, and mobility. This may assist you construct the strength needed to take care of the angle in your torso in your entire set.
Lower Back Rounding
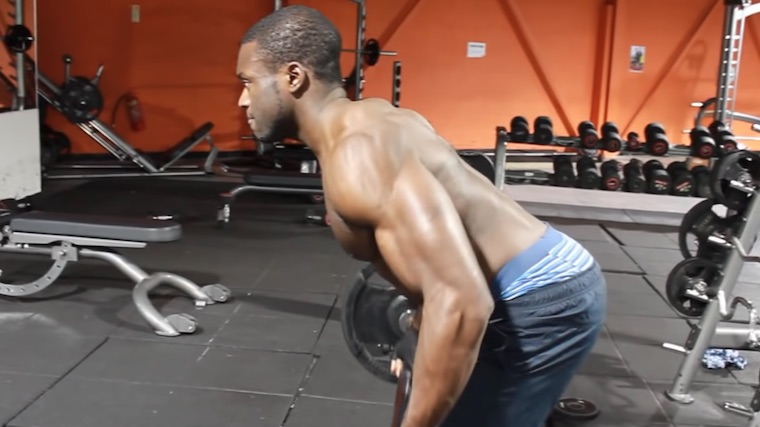
On your spinal health and your longevity within the gym, for goodness sake, keep a flat back each time you perform hinge movements just like the row. While lower back rounding stands out as the results of an absence of mobility, you would also experience this just by going too heavy.
 Credit: Gabriel Sey / YouTube
Avoid it: When you find your lower back rounding when you perform the reverse-grip bent-over row, set your ego aside. Either practice hinge movements until you’re able to maintaining an isometric hinge or reduce the weights significantly and begin over.
Engaging Your Biceps First
Since your biceps are a wrist supinator — accountable for turning your hand right into a palm-up position — they engage the moment you “reverse” your grip on a bent-over row. Along with being a secondary mover to perform the exercise, in addition they stabilize your elbow.
 Credit: MercolaPeakFitness / YouTube
But your biceps mustn’t be the first mover within the reverse-grip bent-over row. That job falls to your lats, and attempting to use your biceps to lift heavy loads meant in your lats won’t end well for the much smaller biceps muscle.
Avoid it: Consciously take into consideration pulling your shoulders back to interact your back muscles before pulling along with your elbows. Don’t try to twist the bar to maneuver the burden.
Utilizing Momentum From Rep to Rep
When you fail to take care of a consistent angle in your torso across each repetition, you is likely to be generating momentum along with your hips that decreases the load in your lats and biceps. This could be a sign of going too heavy, but you may additionally be doing this for ego lifting or just because you’re not being attentive.
 Credit: Maui Athletics / YouTube
Avoid it: If the burden is just too heavy so that you can keep under control, lower it. Otherwise, consider specializing in the eccentric (lowering) portion of the lift to ensure you retain the burden moving in a slow and controlled fashion to forestall momentum from constructing.
Tips on how to Progress the Reverse-Grip Bent-Over Row
If you’ve trouble performing the reverse-grip bent-over row right off the bat, here’s how you may approach it as a beginner and learn how to increase the issue as you proceed to get stronger and progress within the gym.
Yates Row
The Yates row is the cousin of the reverse-grip bent-over row, the difference between the 2 being the angle of your torso. Whilst you perform a reverse-grip bent-over row along with your torso at roughly a 45-degree angle, the Yates row is performed from a more upright position.
The resulting lift targets your rhomboids and your traps along with your lats and biceps. It is probably not nearly as good of a lat builder, nevertheless it makes up for it by hitting your entire back. What was a “mistake” for the reverse-grip row could be used deliberately for a strategic purpose.
As you develop strength performing the Yates Row, you may slowly transition towards the reverse-grip bent-over row by experimenting along with your torso angle. Sinking deeper into the hinge position will let you are feeling your lats working harder as you catch up with to the 45-degree angle.
Add Isometric Holds or Timed Eccentrics
At a certain point, implementing basic linear progression — adding more repetitions or more weight — stops being as useful for lifts just like the reverse-grip bent-over row. Slightly than constantly increasing the load on the bar, which might eventually create a better risk than reward and will decrease stress on the goal muscle, you may add isometric holds or timed eccentrics.
With isometrics, squeeze your back and shoulders at the highest of every repetition for one, two, and even three seconds while the bar is involved along with your abdomen. For timed eccentrics, concentrate on making the negative (lowering) phase of every rep take two, three, or 4 full seconds. This can assist to maximise your gains and develop your mind-muscle connection.
Reverse-Grip Pendlay Row
When you’re seeking to add an additional level of difficulty, swap out the reverse-grip bent-over row for a reverse-grip pendlay row. Since each rep starts and finishes on the bottom, there’s no way so that you can construct momentum from rep to rep, which makes it an amazing lift to isolate your muscles and concentrate on pure pulling strength.
The reverse-grip pendlay row requires more hamstring flexibility than the reverse-grip bent-over row, since you’re in a steep forward-leaning position. Nonetheless, it’s relatively easier in your core and lower back because you don’t need to hold an isometric hinge during your set.
Advantages of the Reverse-Grip Bent-Over Row
Whenever you step into the gym, you come face-to-face with a wide selection of tools and movements that you would be able to use to sculpt your biceps and your lats. Listed below are among the unique advantages of the reverse-grip bent-over row that make it value adding to your routine.
Increased Lat Activation
Switching from a pronated grip to a supinated grip puts your arms and shoulders into a special position and changes the pulling angle, which is why it’s easier to attract the burden closer to your belly button than your sternum. This ends in increased lat activation compared to the standard bent-over row.
Moreover, your rhomboids and traps play much less of a task within the reverse-grip bent-over row than they do once you perform the lift with an overhand grip.
Improved Balance and Core Strength
Holding an isometric hinge isn’t easy. Your core muscles work time beyond regulation to take care of a consistent angle under heavy loads. Concurrently, your hamstrings stay lively and engaged at a lengthened position, which can assist construct strength in your posterior chain while also improving your overall mobility.
Unparalleled Rowing Strength
The reverse-grip bent-over row cuts down on a lot of variables and limiting aspects posed by many other row variations. Generally speaking, you may lift heavier loads with a barbell than you may with a dumbbell.
Flipping your grip from overhand to underhand means your grip strength won’t hold you back as you increase loads over time because your wrists and forearms are in a stronger position. Finally, range of motion tends to be more efficient than with a standard bent-over row, since you’ve improved leverage when tracking the bar closer to your center of gravity.
Whenever you put all these aspects together, what you get is a lift that allows you to lift heavy weights along with your lats, without so lots of the variables that get in the way in which when performing other kinds of rows.
Muscles Worked by the Reverse-Grip Bent-Over Row
As a compound exercise, the reverse-grip bent-over row targets muscles across quite a few joints. Here’s a listing of the most important muscle groups worked by the lift.
Latissimus Dorsi
With some back exercises, you are feeling “your back” working. That’s not the case with the reverse-grip bent-over row. When performed accurately, it is best to give you the chance to feel and, later specifically goal, your lats specifically.
Your lats are the largest muscle group in your upper body — running along all sides of the back half of your torso. Your lats are also the first muscle group working within the reverse-grip bent-over row. A rock-solid pair of lats make your upper body and shoulders appear broader and your waist look more narrow compared, which makes them a vital a part of developing an aesthetic physique.
Biceps
As secondary movers — muscles which assist the first goal muscles during a given exercise — your biceps and your brachialis muscles play two separate roles in the course of the reverse-grip bent-over row. Since your biceps are a wrist supinator, they get direct stimulation to take care of the palm-up position in the course of the lift. More importantly, they’re accountable for stabilizing your elbow during flexion to support the joint because the muscle contracts.
Abdominals
With a barbell held out in front of you and your torso held in an isometric hinge, your abs provide the strength and stability vital to maintain you from buckling over while performing the reverse-grip bent-over row. Especially as you get to heavier loads, you’ll find that your core plays a vital role — keeping your torso held at the specified angle and stabilizing your spine to forestall rounding.
Hamstrings
As with every hinge movement, the reverse-grip bent-over row provides stimulus to your hamstrings. By developing strength within the fully lengthened (stretched) position, the exercise promotes muscular balance and suppleness in your hamstrings.
Tips on how to Program the Reverse-Grip Bent-Over Row
Constructing an efficient training routine could be difficult. Whenever you’re within the gym, you need to take advantage of your time and energy to maximise your gains. When you’re unsure learn how to incorporate the reverse-grip bent-over row into your workout plan, listed below are a couple of options that you just might consider.
As an Accessory for the Deadlift
For powerlifters, who focus on performing the squat, bench press, and deadlift, finding efficient compound (multi-joint) exercises that complement your primary lifts could be a little bit of a chore or just confusing. The reverse-grip bent-over row builds strong lats while performing an isometric hinge, which might improve each strength and mobility across your posterior chain.
Following the deadlift, consider incorporating three to 5 sets of six reps, using a weight that allows you to keep your torso angle solid across the length of the set.
As a Important Movement For Bodybuilders
Within the interest of each exercise economy, and the hormonal response that compound movements provide, many bodybuilders prefer to begin their workouts with heavy compound exercises before they get to their isolation movements. (1)(2) Whenever you’re carving a statue from stone, use the dynamite before you start with the hammer and chisel.
In case your training split has a back and biceps day, the reverse-grip bent-over row allows you to isolate your lats and warm-up your biceps, while also stimulating a hormonal response which can support muscle growth. Early in your workout, hit no less than three sets of eight, specializing in the eccentric portion of the lift to maximise your hypertrophy gains. (3)
As a High Volume Accessory Lift
When you spend a major period of time in a squat rack or on a weight platform, adding the reverse-grip bent-over row as an adjunct after the classic bent-over row could be as much about convenience as the rest. All you’ve to do is flip your wrists around and you’ve a lift that allows you to engage and isolate your lats while also dialing in your rowing technique after the related muscles are thoroughly warmed up and pre-trained.
If you need to implement the reverse-grip bent-over row as a high volume accessory movement, consider performing three sets of 15 following other row variations.
Reverse-Grip Bent-Over Row Variations
Perhaps you don’t have access to a barbell. Perhaps you’re coping with nagging shoulder or back pain. Perhaps you simply need to mix things up. No matter your reasons, listed below are a couple of different lifts that allow you goal your back just like the reverse-grip bent-over row.
Seal Row
As with all chest-supported rows, the seal row provides unique stimulus by stopping you from developing momentum or engaging your hips. Unlike other chest-supported rows, you perform the seal row by lying face down on a flat bench.
The resulting lift can goal your lats and your rhomboids without having to concern yourself with keeping a flat back. The complete bench support also removes strain from the lower back and makes it virtually unattainable to maneuver the burden using momentum.
Single-Arm Dumbbell Row
Single-arm dumbbell rows are a comparatively easy-to-learn introductory lift that keeps paying dividends as you grow within the gym. To start, just kneel on a bench and row.
The one-arm row provides some benefits over barbell rows. Kneeling on a bench limits the quantity of stress in your spine. For the reason that lift is performed one side at a time, you may isolate your lats and proper any muscular imbalances which will develop if you happen to are inclined to exclusively use barbell row variations.
Inverted Row
Advanced pull-ups aren’t the one strategy to utilize your body weight for back-building. Inverted rows could be performed in a lot of other ways — whether that be with suspension straps, on a Smith machine, a barbell set in an influence rack, or every other stable surface that allows you to get under it, and keeping your body in a straight line, pulling upwards.
To modulate the extent of difficulty, simply increase or decrease the angle of your body relative to the ground. Either elevate your feet (for increased difficulty) or create a steep angle with an elevated upper body (to diminish the challenge).
FAQs
Should I perform the reverse-grip bent-over row as a substitute of the bent-over row?
When you’re specifically eager about targeting your lats, the reverse-grip bent-over row can be a superb addition to your routine. It isn’t necessarily a alternative for the bent-over row which, along with targeting your lats, also hits your rhomboids and helps develop grip strength.
Why am I feeling my biceps greater than my back while performing the reverse-grip bent-over row?
When you feel your biceps greater than your back in the course of the reverse-grip bent-over row, you’re probably leading along with your arms. Take into consideration squeezing your back and shoulder muscles before pulling along with your elbows.
What should I do if my mobility keeps me from performing the reverse-grip bent-over row?
No lift is strictly vital to get a superb workout, but improving your mobility could be a crucial a part of joint health and longevity within the gym. Consider incorporating movements that each strengthen your posterior chain and improve your mobility into your routine. Some examples of those include Romanian deadlifts and good mornings.
References
Vingren JL, Kraemer WJ, Ratamess NA, Anderson JM, Volek JS, Maresh CM. Testosterone physiology in resistance exercise and training: the up-stream regulatory elements. Sports Med. 2010 Dec 1;40(12):1037-53. doi: 10.2165/11536910-000000000-00000. PMID: 21058750.
Shaner AA, Vingren JL, Hatfield DL, Budnar RG Jr, Duplanty AA, Hill DW. The acute hormonal response to free weight and machine weight resistance exercise. J Strength Cond Res. 2014 Apr;28(4):1032-40. doi: 10.1519/JSC.0000000000000317. PMID: 24276305.
Hody S, Croisier JL, Bury T, Rogister B, Leprince P. Eccentric Muscle Contractions: Risks and Advantages. Front Physiol. 2019 May 3;10:536. doi: 10.3389/fphys.2019.00536. PMID: 31130877; PMCID: PMC6510035.
Featured Image: mountaira / Shutterstock